Elasticsearch 初探
Elasticsearch 是基于 Lucene 的分布式搜索和分析引擎,是 ELK(Elasticsearch、Logstash、Kibana)生态的核心组件。本文是 Elasticsearch 入门指南,记录了单机环境安装配置、Kibana Dev Tools 可视化操作、索引管理(创建、映射、删除)、文档 CRUD 操作(POST/GET/PUT/DELETE)以及核心概念(倒排索引、分片、副本)的理解。是学习 Elasticsearch 和搭建搜索系统的基础实践。
前言
最近这玩意儿(ELK 生态)好火,简单搭建体验下。
一、安装和启动
1. ElasticSearch 下载
- 官方地址:https://www.elastic.co/cn/downloads/elasticsearch
- GitHub:https://github.com/elastic/elasticsearch
直接下载或 clone 后解压即可。
2. 单实例节点启动
# 进入 elasticsearch 目录下
bin/elasticsearch

# 后台启动
bin/elasticsearch -d
默认端口是 9200,启动完成后访问 http://ip:9200 即可查看到节点的基本信息。
启动踩坑记录:
刚开始启动时,我华丽丽地遇到两个错误。
错误一:
cannot run elasticsearch as root 原因:ES 出于安全考虑,禁止以 root 用户直接运行。
解决:创建一个专属用户并赋予权限。
[root@01 bin]# groupadd xiefy
[root@01 bin]# useradd xiefy -g xiefy -p 123123
[root@01 bin]# chown -R xiefy:xiefy elasticsearch
错误二:
ERROR: [2] bootstrap checks failed
[1]: max file descriptors [65535] for elasticsearch process is too low, increase to at least [65536]
[2]: max virtual memory areas vm.max_map_count [65530] is too low, increase to at least [262144]原因解析:
- 错误 [1]:系统允许的最大文件描述符(max file descriptors)过小。
- 错误 [2]:系统限制的虚拟内存区域(VMA)数量过小(系统默认是 65530,ES 要求至少 262144)。
解决(需要切回 root 用户操作):
# 解决错误一:修改 limits.conf
vi /etc/security/limits.conf
# 在末尾添加如下内容:
* soft nofile 65536
* hard nofile 65536

# 解决错误二:修改 sysctl.conf
vi /etc/sysctl.conf
# 添加如下内容:
vm.max_map_count=655360

# 重新加载内核参数配置使其生效
sysctl -p
3. elasticsearch-head 插件安装
elasticsearch-head 是一个用于浏览 ElasticSearch 集群并与之交互(操作和管理)的 Web 界面工具。
(GitHub:https://github.com/mobz/elasticsearch-head)
它基于 Node.js,所以需要先搞定 Node 环境。
Node.js 源码安装:
- 下载源码:
wget https://nodejs.org/dist/v8.9.4/node-v8.9.4.tar.gz - 解压源码:
tar xzvf node-v* && cd node-v* - 安装编译软件:
sudo yum install gcc gcc-c++ - 编译并安装:
./configure && make && sudo make install - 查看版本验证:
node -v/npm -v
安装 head 插件:
下载或克隆 elasticsearch-head 后,进入 elasticsearch-head-master 目录:
# 安装依赖(速度太慢可使用淘宝镜像:npm install -g cnpm --registry=https://registry.npm.taobao.org)
npm install

# 启动服务
npm run start
此时打开 http://localhost:9100/,虽然能看到页面,但你会发现并没有连接到 ES 集群。
解决跨域问题:
因为 head 插件(9100 端口)和 ES(9200 端口)不在同一个域,需要修改 ES 目录下的 config/elasticsearch.yml:
# 在末尾加入以下内容开启跨域支持
http.cors.enabled: true
http.cors.allow-origin: "*"
重启 ES 后,再次访问管理页面,连接成功!
4. 分布式安装启动(集群初体验)
Elasticsearch 的横向扩展极其容易。这里我建立一个主节点(node-master),两个随从节点(node-1, node-2)。
我提前在同一台机器上拷贝了三份 ES 目录:elasticsearch-master、elasticsearch-node1、elasticsearch-node2。
分别配置这三个 ES 目录中的 config/elasticsearch.yml:
node-master:
cluster.name: xiefy_elastic
node.name: node-master
node.master: true
network.host: 0.0.0.0

# 允许 head 插件跨域访问
http.cors.enabled: true
http.cors.allow-origin: "*"node-1:
cluster.name: xiefy_elastic
node.name: node-1
network.host: 0.0.0.0
http.port: 9201
discovery.zen.ping.unicast.hosts: ["127.0.0.1"]node-2:(参考 node-1,端口改为 9202)
核心配置解释:
cluster.name:集群名称,节点靠这个名字来认亲。node.name:节点名称。node.master:是否有资格被选举为主节点(默认不写的话,第一个起来的就是 Master)。network.host:默认只允许127.0.0.1访问,为了方便远程测试,这里配成了0.0.0.0。http.port:单机多实例时端口会冲突,这里手动指定区分开。discovery.zen.ping.unicast.hosts:ES 默认使用 Zen discovery 机制组建集群,这里配置主节点的 IP 列表用于节点发现。
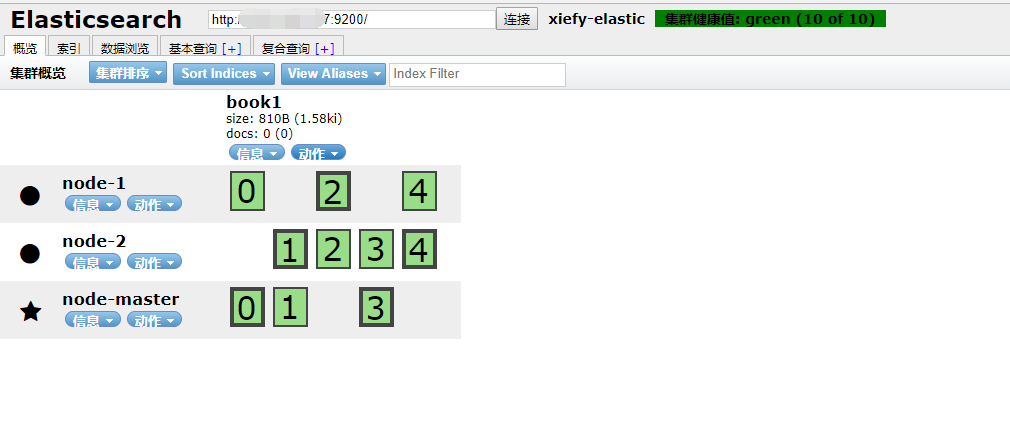
分别启动这三个 ES 实例和 head 插件,访问 http://ip:9100,就能看到一个漂亮的带有索引分片的集群架构图了:
二、基础概念
为了方便理解,先拿 ElasticSearch 与传统关系型数据库(RDBMS)的术语做一个直观比较:
| 关系型数据库 (RDBMS) | ElasticSearch | 备注说明 |
|---|---|---|
| Database (数据库) | Index (索引) | |
| Table (表) | Type (类型) | 注:ES 7.x 已废弃 Type 概念,默认统一为 _doc |
| Row (行) | Document (文档) | JSON 格式的数据 |
| Column (列) | Field (字段) | |
| Schema (表结构) | Mapping (映射) | |
| Index (索引) | Everything is indexed | ES 倒排索引机制 |
| SQL | Query DSL | JSON 格式的查询语句 |
SELECT * FROM table | GET http://... | RESTful 风格 |
UPDATE table SET... | PUT http://... | RESTful 风格 |
集群物理概念:
- Node:一个 ES 服务实例。
- Cluster:多个 Node 组成一个集群。
- Shard:数据分片。一个 Index 可能会有多个 Shards,分布在不同的 Node 上。
- Replica:Shard 的备份。分为 Primary Shard(主分片)和 Replica Shards(副本分片)。
为什么需要 Shards & Replicas?
- 高可用性:副本在分片或节点发生故障时充当备胎。因此,副本分片永远不会和它的主分片分配在同一个物理节点上。
- 高吞吐量:允许扩展搜索量,因为可以在所有副本上并行执行搜索。
注意:可以在创建索引时定义分片和副本的数量。创建后,可以随时动态更改“副本数”,但绝不能再更改“分片数”。每个 ES 分片本质上是一个 Lucene 索引,单分片的最大文档数量约为 21 亿(
Integer.MAX_VALUE - 128)。
THE REST API
Elasticsearch 提供了极度丰富的 REST API 来与集群交互。通过 _cat 接口可以查看到许多底层资源:
# 偷偷看一眼集群健康状态
curl -XGET 'localhost:9200/_cat/health?v'

# 看看都有哪些节点
curl -XGET 'localhost:9200/_cat/nodes?v&pretty'
三、基础用法 (CRUD)
1. 索引创建
可以直接使用 head 插件的 UI 界面创建,或者通过 REST API:
# 新建名为 book 的索引
curl -X PUT 'localhost:9200/book'

# 删除该索引
curl -X DELETE 'localhost:9200/book'

# 查看当前节点下的所有 Index
curl -X GET 'http://localhost:9200/_cat/indices?v'
这样创建的 Index 是没有具体结构的(mappings: {})。下面来定义一个带结构映射的 Index:
请求:PUT http://ip:9200/people
{
    "settings": {
        "number_of_shards": 3,
        "number_of_replicas": 1
    },
    "mappings": {
        "man": {
            "properties": {
                "name": {"type": "text"},
                "country": {"type": "keyword"},
                "age": {"type": "integer"},
                "birthday": {
                    "type": "date",
                    "format": "yyyy-MM-dd HH:mm:ss||yyyy-MM-dd||epoch_millis"
                }
            }
        }
    }
}
2. 插入数据
请求:PUT http://ip:9200/people/man/1 (指定 ID 为 1)
{
    "name": "伊布",
    "country": "瑞典",
    "age": 30,
    "birthday": "1988-12-12"
}
如果不指定 ID,需要改用 POST 请求,ES 会自动生成一串随机字符串作为 ID。
神奇的一点:ES 不会限制你在创建一个文档之前,必须先手动建立好索引和类型。如果你直接往一个不存在的索引里塞数据,ES 会自动帮你把它们建好。
3. 更新与替换数据
局部更新:POST http://ip:9200/people/man/1/_update
{
    "doc": {
        "name": "梅西真的很强"
    }
}脚本更新:
{ "script": "ctx._source.age += 10" }(这里把年龄加 10,ctx._source 代表了当前文档对象的引用)
全量替换(重建索引):PUT http://ip:9200/people/man/1
{"name": "伊布的全新数据"}(这会用新的文档内容彻底覆盖取代旧文档)
4. 删除数据
curl -X DELETE 'http://ip:9200/people/man/1'5. 查看数据
根据 ID 查询:GET http://ip:9200/people/man/1?pretty=true
{
  "_index": "people",
  "_type": "man",
  "_id": "1",
  "_version": 1,
  "found": true,
  "_source": {
    "name": "伊布",
    "country": "瑞典",
    "age": 30,
    "birthday": "1988-12-12"
  }
}查询全部(带排序与分页):POST http://ip:9200/people/_search
ES 默认从 0 开始(from),一次返回 10 条(size),并按照 _score(匹配度)倒排。
{
    "query": { "match_all": {} },
    "sort": [
        { "birthday": {"order": "desc"} }
    ],
    "from": 0,
    "size": 5
}
返回结果中包含了 took(耗时毫秒)、hits.total(总命中数)以及具体的 hits 记录数组。
简单关键字查询:
{
    "query": {
        "match": {"name": "梅西"}
    }
}注意:
match默认是模糊分词匹配。如果查询 "西2",它会把包含 "西" 或 "2" 的文档都搜出来(隐式的 OR 关系)。如果是明确的 AND 关系,需要使用布尔查询(见下文)。
6. 聚合查询 (Aggregations)
请求:POST http://ip:9200/people/_search
分组聚合(类似 SQL 的 GROUP BY):
{
    "aggs": {
        "group_by_age": {
            "terms": {"field": "age"}
        }
    }
}
在单个请求中同时查询数据并进行聚合运算,能极大降低网络请求次数。返回结果中除了 hits,还会多出一个 aggregations 节点,里面包含了按年龄分组统计的 buckets(桶)。
统计函数聚合:
{
    "aggs": {
        "tongji_age": {
            "stats": {"field": "age"}
        }
    }
}
stats 会一次性返回该字段的:count(总数)、min(最小)、max(最大)、avg(平均值)和 sum(求和)。如果只需要某一项,直接把 stats 替换为 sum 即可。
四、高级查询 (Query DSL)
主要分为全文文本查询和结构化级别查询。
1. 文本查询
- 标准模糊匹配:
json
{"query": {"match": {"name": "西2"}}} - 短语精确匹配(不分词打乱):
json
{"query": {"match_phrase": {"name": "西2"}}} - 多字段匹配:
json
{"query": {"multi_match": {"query": "瑞典", "fields": ["name", "country"]}}} - 语法糖查询(支持 AND/OR 表达式):
json
{"query": {"query_string": {"query": "(西 AND 梅) OR 布"}}}
2. 结构化数据查询
用于精确匹配数字、日期等结构化字段:
// 精确匹配 Term
{"query": {"term": { "age": 24}}}

// 范围匹配 Range
{"query": {
    "range": {
        "birthday": {
            "gte": "1980-01-01",
            "lte": "now"
        }
    }
}}
3. 复合查询 (Bool & Filter)
Filter Context(过滤上下文):
用来做纯粹的数据过滤(Yes or No)。相比于普通的 Query,Filter 不会计算相关度得分(_score),且查询结果会被 ES 自动放入缓存中,速度极快!
{
    "query": {
        "bool": {
            "filter": {
                "term": { "age": 24 }
            }
        }
    }
}
Constant Score(固定分数查询):
如果我们只是为了过滤文档,不在乎它们的具体匹配度,可以使用 constant_score 配合 filter,强制指定一个固定得分(默认是 1):
{
    "query": {
        "constant_score": {
            "filter": {
                "match": {"name": "梅西"}
            },
            "boost": 2
        }
    }
}
布尔复杂查询 (Bool Query):
通过组合 must(必须满足/AND)、should(应该满足/OR)、must_not(不能满足/NOT)和 filter,可以实现极其复杂的嵌套逻辑。
{
    "query": {
        "bool": {
            "must": [
                { "match": {"name": "梅西"} },
                { "match": {"country": "阿根廷"}}
            ],
            "filter": [{
                "term": { "age": 32 }
            }],
            "must_not": {
                "term": {"country": "巴西"}
            }
        }
    }
}
五、关于中文分词 (IK 分词器)
为什么一定需要中文分词插件?我们可以先看看 ES 默认的分析器(Analyzer)是如何处理的。
测试英文:GET http://ip:9200/_analyze?analyzer=standard&text=hello world
它会乖乖地按照空格和标点符号切分成 hello 和 world。
测试中文:GET http://ip:9200/_analyze?analyzer=standard&text=你好啊
{
  "tokens": [
    {"token": "你", "position": 0},
    {"token": "好", "position": 1},
    {"token": "啊", "position": 2}
  ]
}
显然,ES 默认把中文当成了单字切分,毫无语义可言,这样搜出来的结果肯定是乱七八糟的。所以,引入强大的中文分词器是必须的。
IK 分词器安装
IK: https://github.com/medcl/elasticsearch-analysis-ik
The IK Analysis plugin integrates Lucene IK analyzer into elasticsearch, support customized dictionary.
安装
- Download or compile
-
optional 1 - download pre-build package from here: https://github.com/medcl/elasticsearch-analysis-ik/releases
unzip plugin to folder
your-es-root/plugins/ -
optional 2 - use elasticsearch-plugin to install ( version > v5.5.1 ):
./bin/elasticsearch-plugin install https://github.com/medcl/elasticsearch-analysis-ik/releases/download/v6.2.1/elasticsearch-analysis-ik-6.2.1.zip
2.restart elasticsearch
两种安装方式, 任选其一, 注意版本就好
Github里有Quick Example 可以看下怎么使用
需要在建立索引时指定ik分词器, 建立索引和搜索索引字段都需要指定, 例如:
"analyzer": "ik_max_word"和"search_analyzer": "ik_max_word"
IK提供两种分词规则:
- ik_max_word: 会将文本做最细粒度的拆分,比如会将“中华人民共和国国歌”拆分为“中华人民共和国,中华人民,中华,华人,人民共和国,人民,人,民,共和国,共和,和,国国,国歌”,会穷尽各种可能的组合;
- ik_smart: 会做最粗粒度的拆分,比如会将“中华人民共和国国歌”拆分为“中华人民共和国,国歌”。
除此之外, IK也支持扩展自定义词典, 以及热更新.
# Test
GET http://47.94.210.157:9200/_analyze?analyzer=ik_max_word&pretty=true&text=你好,啊

{
  "tokens": [
    {
      "token": "你好",
      "start_offset": 0,
      "end_offset": 2,
      "type": "CN_WORD",
      "position": 0
    },
    {
      "token": "啊",
      "start_offset": 3,
      "end_offset": 4,
      "type": "CN_CHAR",
      "position": 1
    }
  ]
}
六: Spring Boot 集成 Elastic Search
版本参考
| Spring Boot Version (x) | Spring Data Elasticsearch Version (y) | Elasticsearch Version (z) |
|---|---|---|
| x <= 1.3.5 | y <= 1.3.4 | z <= 1.7.2* |
| x >= 1.4.x | 2.0.0 <=y < 5.0.0** | 2.0.0 <= z < 5.0.0** |
| 服务器集群ES版本 | 5.5.2 |
|---|---|
| Spring boot | 1.5.9.RELEASE |
| Elastic Search | 5.5.2 |
| log4j-core | 2.7 |
集成步骤
- 引入Maven依赖:
<properties>
 <log4j-core.version>2.7</log4j-core.version>
 <elasticsearch-version>5.5.2</elasticsearch-version>
</properties>

<dependency>
 <groupId>org.elasticsearch.client</groupId>
 <artifactId>transport</artifactId>
 <version>${elasticsearch.version}</version>
</dependency>

<!--
<dependency>
 <groupId>org.elasticsearch</groupId>
 <artifactId>elasticsearch</artifactId>
 <version>${elasticsearch-version}</version>
</dependency>
-->注意: transport中依赖了elasticsearch, 但默认是2.4.6版本, 需要指定下elasticsearch的版本5.5.2
- 也可以直接引入:
<dependency>
  <groupId>org.springframework.boot</groupId>
  <artifactId>spring-boot-starter-data-elasticsearch</artifactId>
</dependency>但是spring-boot-starter-data-elasticsearch只支持到2.4.x版本的es.
如果使用5.x.x版本ES, 就用上面那种方式单独引入ES依赖.
- 添加配置类
@Configuration
public class ElasticSearchConfig {

    /** 集群host */
    @Value("${spring.data.elasticsearch.cluster-nodes}")
    private String clusterNodes;

    /** 集群名称 */
    @Value("${spring.data.elasticsearch.cluster-name}")
    private String clusterName;

    @Bean
    public TransportClient client() throws UnknownHostException{

        InetSocketTransportAddress node = new InetSocketTransportAddress(
                InetAddress.getByName(clusterNodes), 9300
        );

        Settings settings = Settings.builder().put("cluster.name", clusterName).build();

        TransportClient client = new PreBuiltTransportClient(settings);
        client.addTransportAddress(node);
        return client;
    }
}application.properties中配置:
spring.data.elasticsearch.cluster-nodes=xxxspring.data.elasticsearch.cluster-name=xxx
测试用例
简单的CRUD操作:
github: https://github.com/thxiex/elasticsearch_demo.git
@Link com.thank.elasticsearch.TestElasticSearchCRUD.java